Crop images
Trim edges from the center to get a chosen ratio without stretching the content.
Reference edition 2.0.0. Version 2.0.0 is a pre-release for Windows and Linux, available by manual download. Some screenshots come from an earlier development edition and may show different controls; their values are examples. Review your package’s release notes and saving options before processing.
On this page
What cropping means
Cropping keeps an area of the photograph and removes surrounding edges from output. It neither adds space nor sets a specific final resolution by itself. Use Resize afterwards for exact pixel dimensions.
Open Resize → Crop. This tab shares up to 100 images with Resize and Canvas. Prefer JPEG, PNG, WebP, BMP, TIFF, or supported HEIC/HEIF. Convert AVIF or ICO to a supported working format first. Animated and multipage images are not processed as sequences.
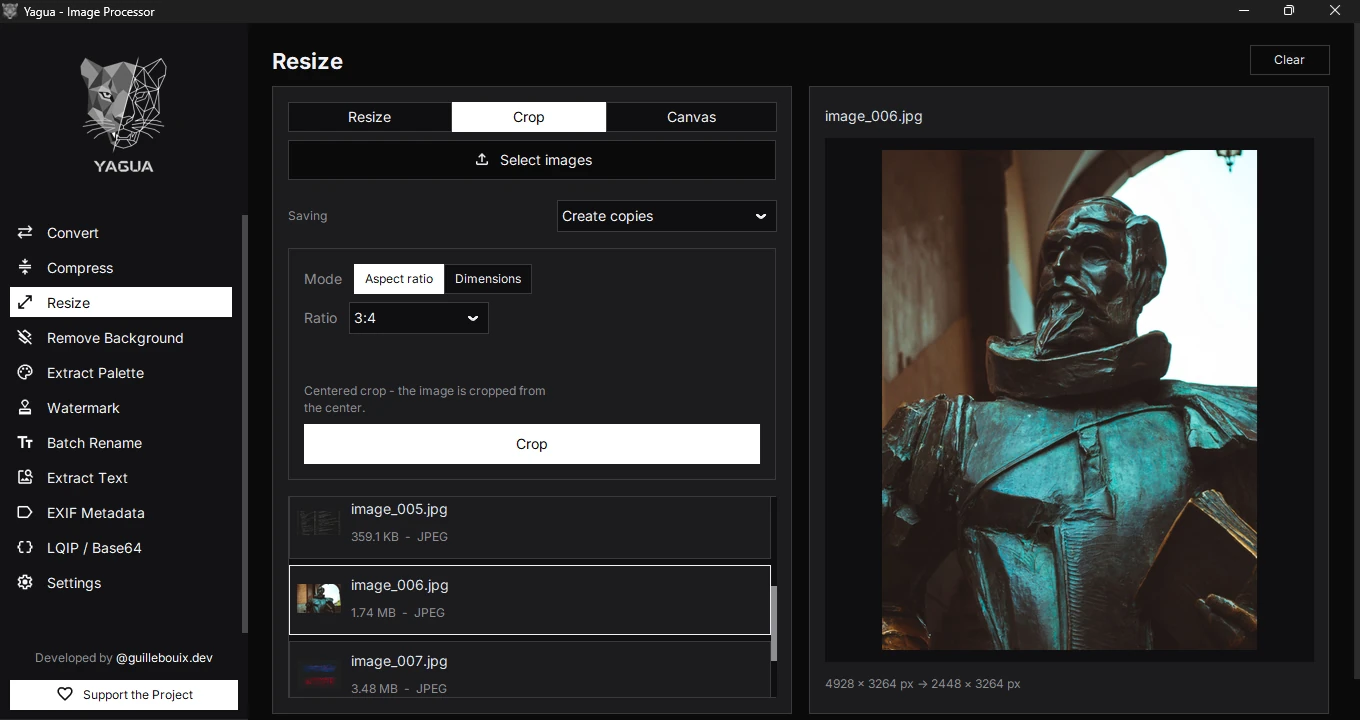
Controls
| Control | Options and behavior |
|---|---|
| Mode | Aspect ratio or dimensions. |
| Select images | Loads or replaces the shared batch. |
| Aspect ratio | 1:1, 4:3, 3:4, 16:9, 9:16, 3:2, 2:3, 21:9; initially 1:1. |
| Dimensions | Pixel width and height fields synchronized with sliders. Selecting another image updates the values and slider limits to its oriented dimensions. |
| Saving | Create copies or Overwrite originals. |
| Crop | Prepares the destination and asks for confirmation. |
| Clear | Empties all three sizing tabs without deleting disk files. |
16:9 means 16 units wide for 9 high, not 16 × 9 pixels. Cropping keeps the largest centered area matching that ratio. You can also choose Dimensions to enter the crop width and height in pixels. Fields and sliders stay synchronized. When you select another image, the app uses its EXIF-oriented dimensions and adjusts slider limits to that file; manual fields do not extend those limits. Both modes crop from the center.
Procedure
- Load a photo copy with Select images.
- Choose the Ratio.
- Consider subject position: this tool always crops from the center.
- Under Saving, choose Create copies, click Crop, choose a folder, and review the confirmation.
- Open the result and check that important content remains.
The right panel shows a reduced preview of the selected crop and its source and result dimensions. Use it to review framing, not final detail at 1:1. There is no draggable rectangle to move the crop area: cropping is always centered. Changing the ratio or dimensions updates the preview but does not save or modify files.
In Dimensions mode, if an image in the batch is too small for the requested crop, that image is skipped: its original is preserved and the rest continue. Skips are reported separately from processing errors.
Example
A 4000 × 3000 landscape photo cropped to 1:1 produces 3000 × 3000, removing approximately 500 pixels per side. 16:9 produces 4000 × 2250, trimming top and bottom.
To then get 1280 × 720, load the cropped file in Resize and enter those dimensions. Switching tabs without loading that output processes the original selection again.
Saving and limits
Create copies retains the base name, such as foto.jpg, with a numbered variant for an occupied destination. This mode preserves the original. Overwrite originals allows replacement. The format is saved again: this is not guaranteed lossless cropping or complete metadata preservation.
Calculations round to whole pixels. Very small images can show minor ratio differences. Test before applying a framing choice to a collection with subjects in different positions.
Clear empties the shared batch without undoing exported crops. The ratio remains. A new selection replaces inputs even while on the Crop tab.